
Guide to Screen Printing T-Shirts at Home DIY Ghetto Style (With Pictures)
Posted by Polu Chan on 31st Aug 2017
Who Is This Screen Printing T-Shirt Guide For?
This guide is for those at home who want cheap screen printing of quality t-shirts or those who want to try out screen printing as a hobby but lack access to professional t-shirt printing equipment. Card stock will be used to great effect instead of the usual film positive light block stencils illustrated in other screen printing guides. Using simple card stock means we no longer need computers, printers or expensive transparency film, thus widening access to this art form.
Users need to follow the steps in chronological order. Take your time. Take notes along the way both to solve problems and to prevent the repetition of them. T-Shirt printing via screen printing as a process is a trouble shooting exercise as you will realise. So many things can go wrong but if you follow the steps and advice listed here, you will minimise them and end up with high quality custom printed t-shirts. Although this guide is Ghetto in the sense that many cheap cost cutting hacks are used, the final screen printed t-shirt will be of professional quality which will last many washes without fading, unlike inkjet transfers, laser transfers and gimmicky methods of screen printing. You can expect a high quality product because we will use high quality ink on proper screen printing frames.
Part 1: Collect the Equipment
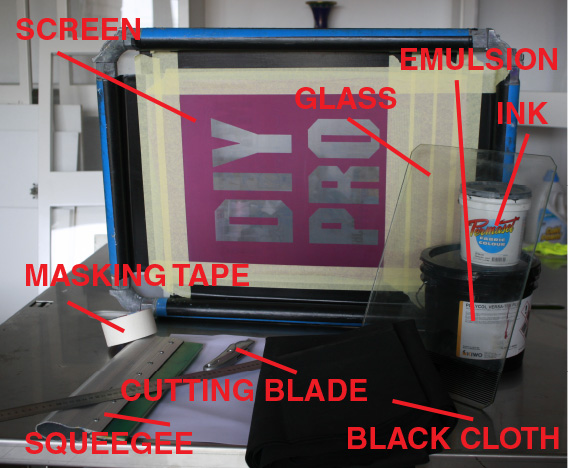
Essential Equipment:
Dual cure screen printing emulsion which is water ressistant. Emulsion for t-shirt printing comes in 2 types. Those with Diazo and those without. Diazo emulsions are water ressistant and are designed for waterbased inks. Diazo free emulsions are for plastisol inks. Plastisol inks are more expensive, are harder to clean up (you need solvents) but are easier to work with in a professional settings since they do not dry in the screen during long runs. For our purposes, we use water base inks since they are easier to work with in a home setting. Water base inks can be cleaned with water and are usually drain safe. Effluent from plastisol clean up needs to be filtered or treated to be drain safe.
A screen printing frame with mesh at proper tension. Wooden or aluminium frames are both suitable but you need to ensure they have good tension. When you poke your finger against the mesh, it must be firm and not sag like a fishing net. Screens with proper tension will result in sharper print, prevent over inking of the print, and help with registration if you are doing more than a 1 colour print.
A Wide Squeegee. Get the widest squeegee you can as we will use this coat our screen and to print as well. Either wooden or aluminium squeegees are fine.
Quality waterbase screen printing ink. Go for a professional brand like Permaset, Virus, Matsui or Green Glaxay. Stay away from Speedball or no brand names from China.
You can buy the equipment used from Ebay, Gumtree or Craiglist. You can get screen printing kits at less than half retail price by checking these sites regularly as many hobby screen printers quit and sell off their equipment. The main reason is they have not been taught properly how to screen print. They may know the steps of what needs to be done but they don't know the reasoning behind it. Thus when something goes wrong, they have no idea how to fix it. Frustration builds and the project is put to one side till later. When they need space in their garage, you can pick up their equipment on the cheap. This guide will attempt explain the process behind it as well as the steps require where ever possible.
Part 2: Prepare the UV Blocking Stencil

Cut out stencil made of card stock.
In this guide card stock cut into shape will be used as the stencil. Cut the little holes first from the letters like A and O, followed by the complete letter. The stencil can be anything that blocks Ultraviolet UV light. Light is made of many colours, it is the ultraviolet (blue) spectrum that cures the emulsion. Red, green, yellow etc have no effect. That is why sometimes screen printers work under red light. I have used white card stock in this project since I wanted to print out the letters on my printer but black card stock will give the best result since it blocks all light from passing through. I decided to go with the "DIY PRO" design in Machine Font. Machine font is made up of only straight lines so it is easy to cut out the shapes with only a cutting blade and steel ruler. For the stencil you can draw out the artwork onto black card stock and cut it out. You can even forgo the stencil itself and draw your design directly onto the dried emulsion. Use a black ink pen - you will need more than one coat on ink. With this method you can get more intricate designs made up. A good way to test if your stencil is dark enough is to hold the screen against a fluorescent light. If you do not see the light, the stencil is suitable.
If you have an inkjet or laser printer that prints on clear transparency, use that. It is difficult for home printers to produce a stencil which is dark enough. The printer controls do not allow you to lay down enough ink to form a suitable black stencil. Plus the ink itself is not designed for that purpose. To achieve this you need to print 2 stencils and lay them up. Remember to print one stencil the right way and the other mirrored so that when you stick them together the ink forms 1 layer. If you just put one transparency on top of other some light will filter through the transparency film itself and under cutting will occur. Helpful guidelines on preparing artwork for screen printing can be found on an earlier blog post on artwork requirements for custom t-shirt printing.
Part 3: Screen Preparation
Now we need to coat the screen with emulsion. Before we start we need to ensure there are no foreign particles that will interfere with the emulsion coating so wash with a cleaner like Windex or Simple Green. Use simple cleaners without additives like deodorants. Wash the complete screen, frames and mesh, both sides. If there is dust on the frame, it can work its way into the mesh when we coat it with emulsion, causing pinholes in the completed screen. Dust particles block ultraviolet light. If there is dust on the screen, spurious holes will be washed out which let ink through and this ruins out print. After washing leave the screen to dry in air or you can use a hair dryer to speed up the process.
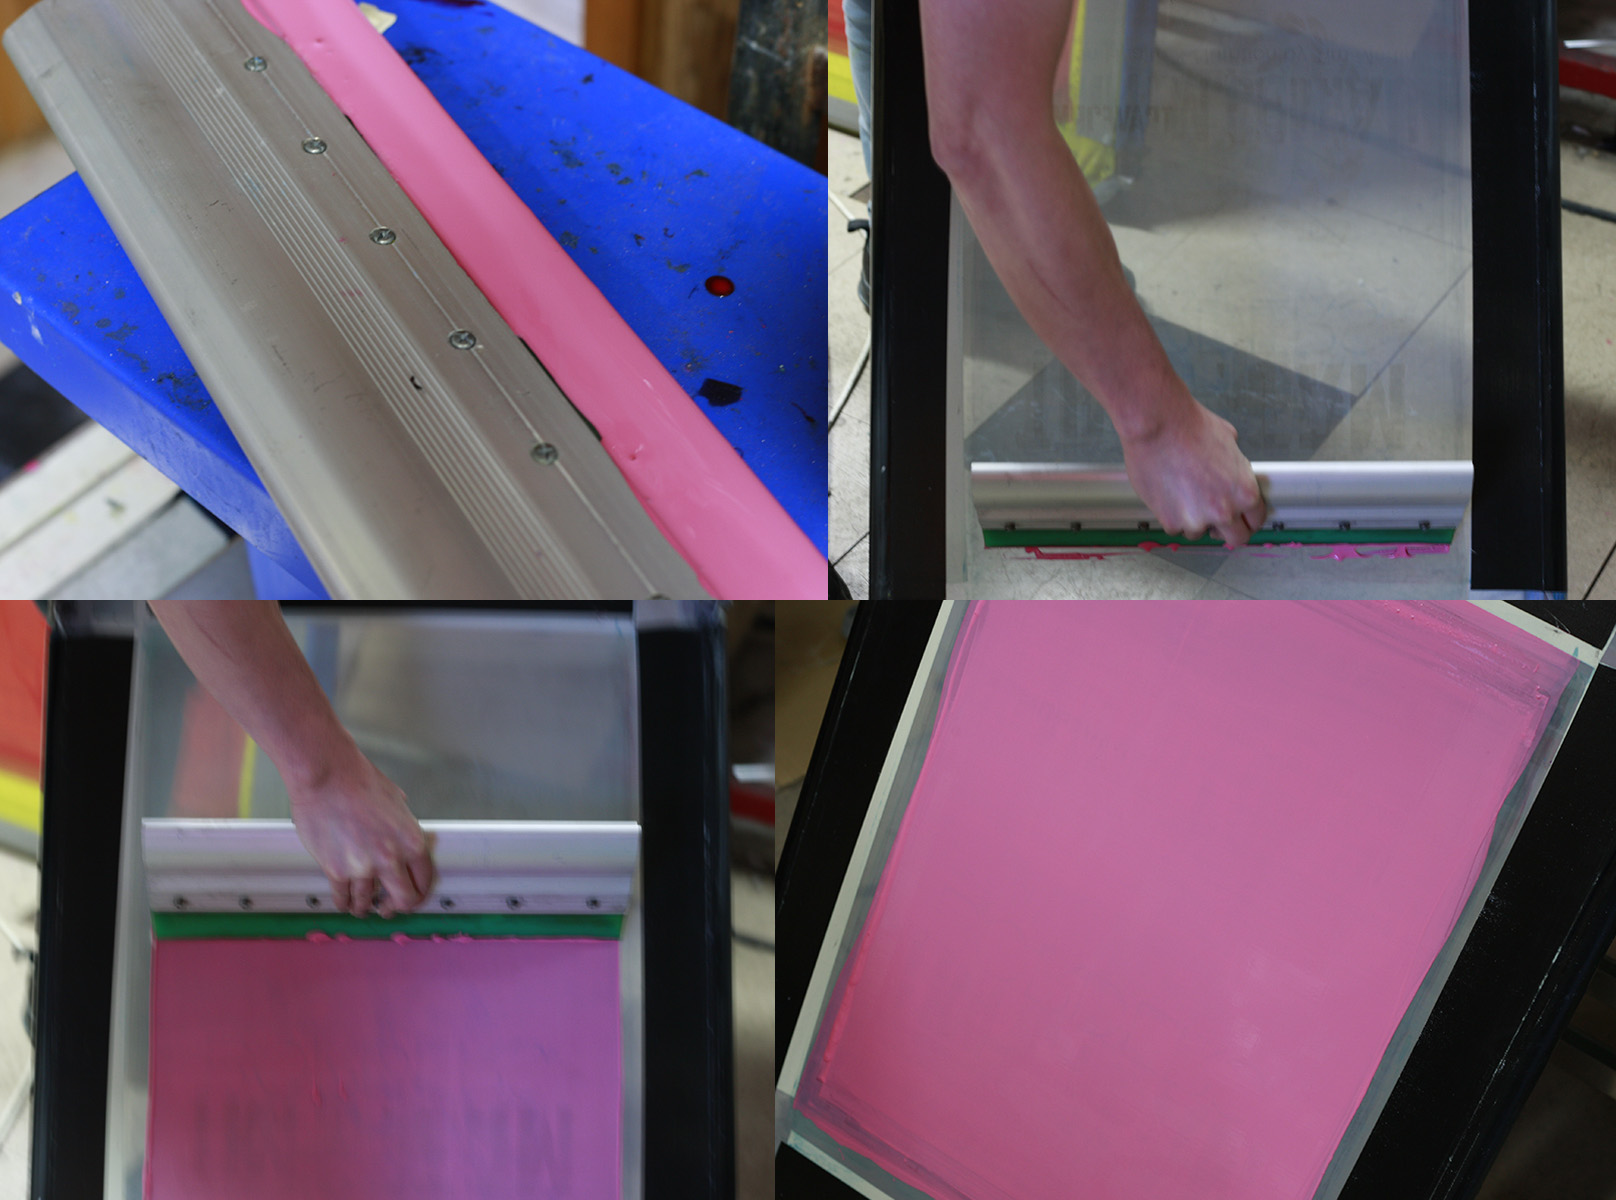
Emulsion spread evenly on squeegee and application onto screen.
Applying the emulsion coating. For this step we need to work in a UV free zone. You can work under fluroscent lights or any home lighting. Red lights as in photo developing is an overkill for screen printing screens - no need for them. As long as you stay away from sunlight, even indirect sunglight, you should be fine. If you have a scoop coater use that, if not you can use the squeegee as a makeshift scoop coater. Spread the emulsion on one side of the squeegee only. Spread evenly along the edge. Put on enough so that there is sufficient emulsion to coat the screen in one stroke. Hold the screen from the side at an inclination of approximately 70 degrees from the floor. Place the squeegee or scoop coater at the bottom of the screen, push against the mesh and wait for a little while. The emulsion will start to flow to the screen mesh and pool up there. Once it starts pooling pull the squeegee upwards at a steady pace, whilst constantly pushing against the mesh. Do this one time from the t-shirt side of the screen and then flip the screen to the other side and repeat the process. You may need to do the second coating 2 times to get enough emulsion onto the mesh. We want an even coating of emulsion sitting on the t-shirt side of the screen. Always do the t-shirt side first, followed by the ink side. When you see an even layer of emulsion on the t-shirt side glistening, there is sufficient emulsion on the mesh.
You will make a mess of this process the first few times. Just scrape off all the emulsion and place back into the tub and start again. Be careful not to introduce any foreign objects into the virgin tub of emulsion. If you see dirt in the emulsion do not put it back into the tub. Throw it away. You can dry the screen by leaving it horizontally in air with the t-shirt side of the screen facing down or you can speed up the drying process by drying with hot air. Keep the hair dryer about 15 cm from the mesh and move constantly side to side, up and down. Do not leave in one place for too long as you can over heat and cook the emulsion. Over heated emulsion will not wash out with water. You can see the emulsion changing colour when it dries. From a glistening coating it becomes a matt dull coating. After a few minutes of hot air drying, it will be dry to touch. For insurance dry a little longer.
Part 4: Dried Screen Exposure to Sunlight
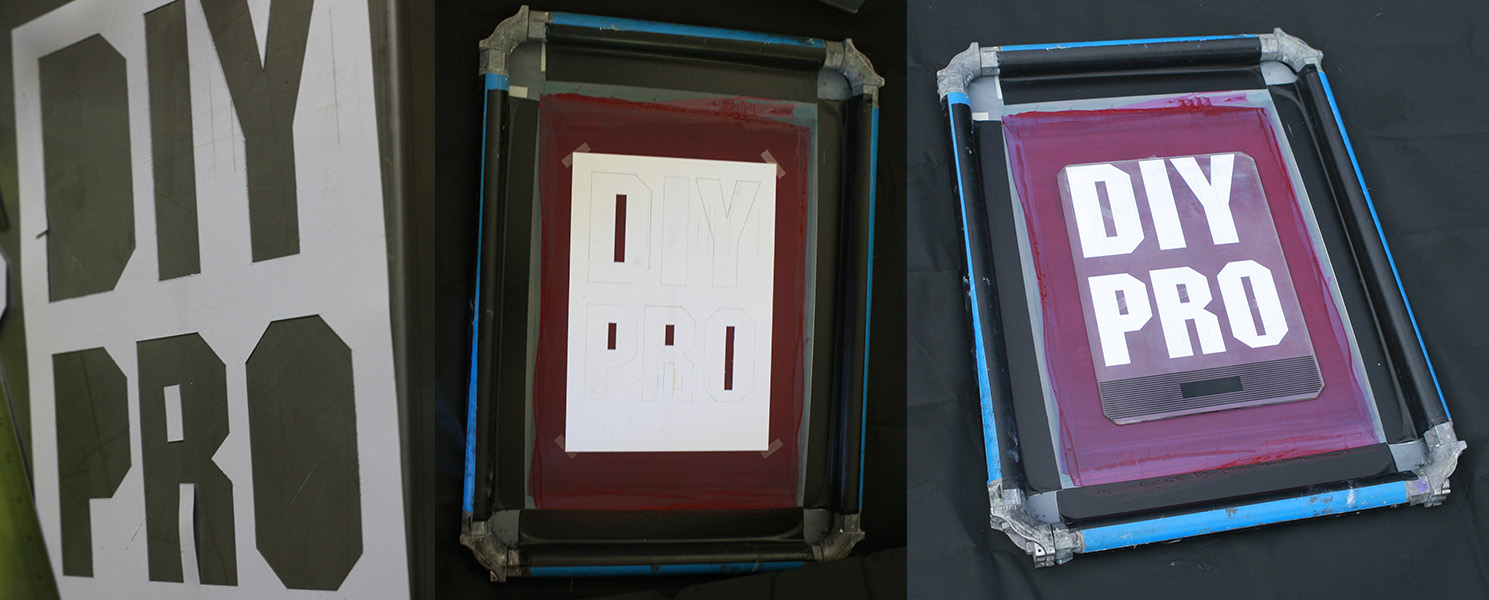
Lining up the artwork and exposing in sunlight.
If you have made transparency stencils, line up the transparencies using the frame as reference and tape it down firmly against the mesh. If you have made card stock stencils stick down the master piece first with clear tape. Use the master piece to line up all the letters and stick the letters down one by one to the mesh. Remove the master cut out stencil. Your artwork should be lineup up straight and spaced evenly.
Now it is time to expose the screen. There are three layers in the apparatus. The black cloth sitting at the bottom. The coated screen with the ink side up sitting on the cloth. Then a clear piece of glass. Note that my piece of glass has black markings on the bottom, the black markings had to be masked off when printing. The purpose of the glass is to push the card stock firmly against the mesh to prevent light from getting in between the card stock and the mesh. If light goes in that gap, the final screen will be compromised by under cutting. The purpose of the black cloth is to absorb any light passing through the screen. If we used a white cloth, some of the light would bounce back upwards towards the sun after passing through the coated mesh. This will also introduce under cutting. Under cutting just means that the edge details will become fuzzy. We want solid, sharp lines on the screen, not fuzzy ones. Wrap the whole apparatus up in the black cloth and take out doors into sunlight. Leave in sunlight for 3-6 minutes. Emulsion exposes at different rates depending whether it is sunny or cloudy, the season, the humidity and temperature. Exposure times will be longer in cloudy days, winter (due to the angle of the sunlight hitting the surface of the earth), the more humidity there is and the lower the temperature it is. Take notes on the conditions on the day and adjust accordingly. If you have two screens, sacrifice one to get an approximate value and adjust for the good screen on the second run. Once the time is up, wrap up the screen and take back indoors again.
Step 5: Washing Out Screen Printing Frames and Taping Up
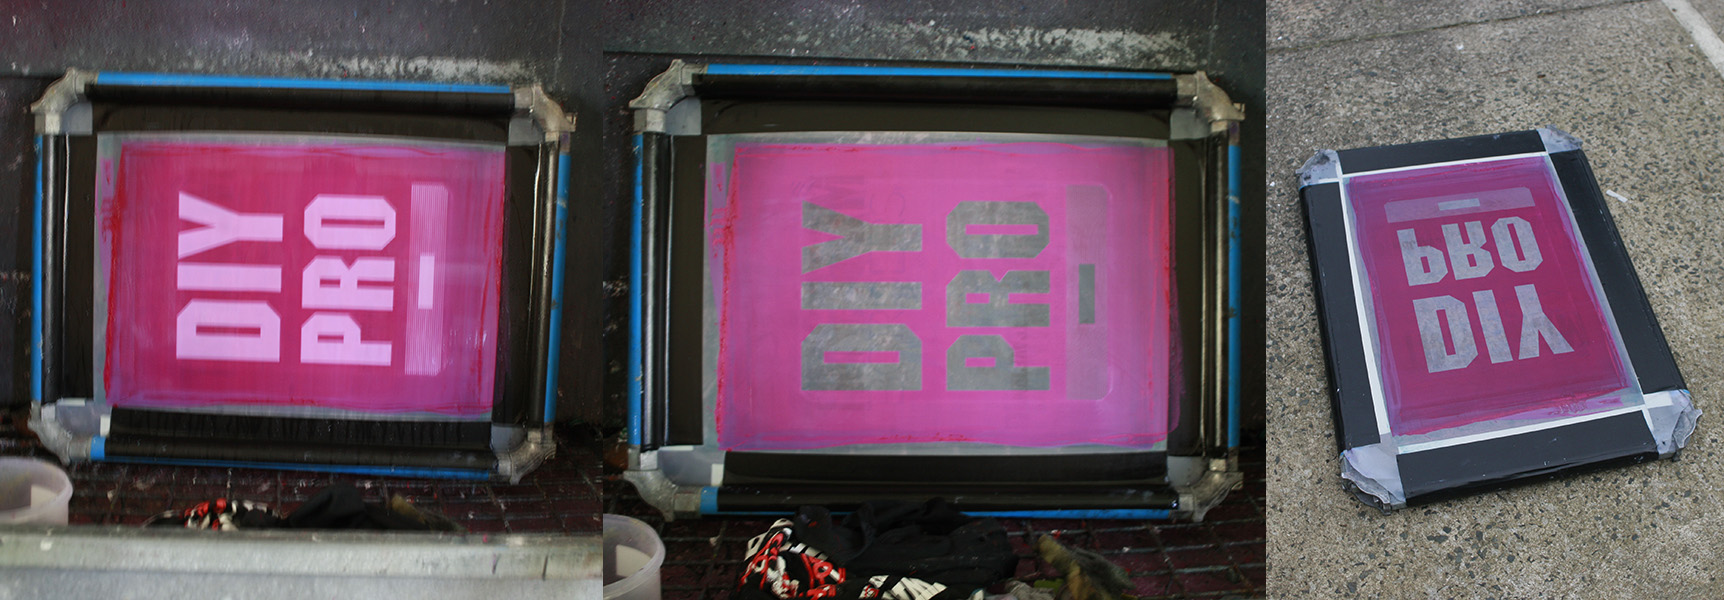
Washing out and post exposure in sunlight.
Wet the screen on both sides at one minute intervals. You will see the screen developing almost immediately. Emulsion not exposed to sunlight will turn milky and soft. Emulsion exposed to sunlight remain the same. After 5 minutes spray a strong stream of water against the screen to wash out the softened emulsion. If the whole screen becomes slimy and you wash out parts of your design, you have an under exposed screen. You will need to increase the exposure time. If the screen is under exposed it can still be salvaged. Wash out the details with a soft sponge rather than a strong stream of water - be careful not to brush too hard washing away your design. Pad dry with newsprint and take it back into sunlight for post exposure. If the screen is over exposed it is more difficult. The design will be filled in and you may have to use a pressure washer to wash out the details. Sometimes its so over exposed that nothing can be done. You just have to start again. This is where a spare screen for testing is very beneficial.
After the screen is dried and post exposed if necessary use masking tape to tape off all the areas where ink is not wanted. Namely the gaps between the emulsion coating and screen frame. If you have pin holes, use masking tape to block those holes from the t-shirt side.
Part 6: Screen Printing the Design on T-Shirt
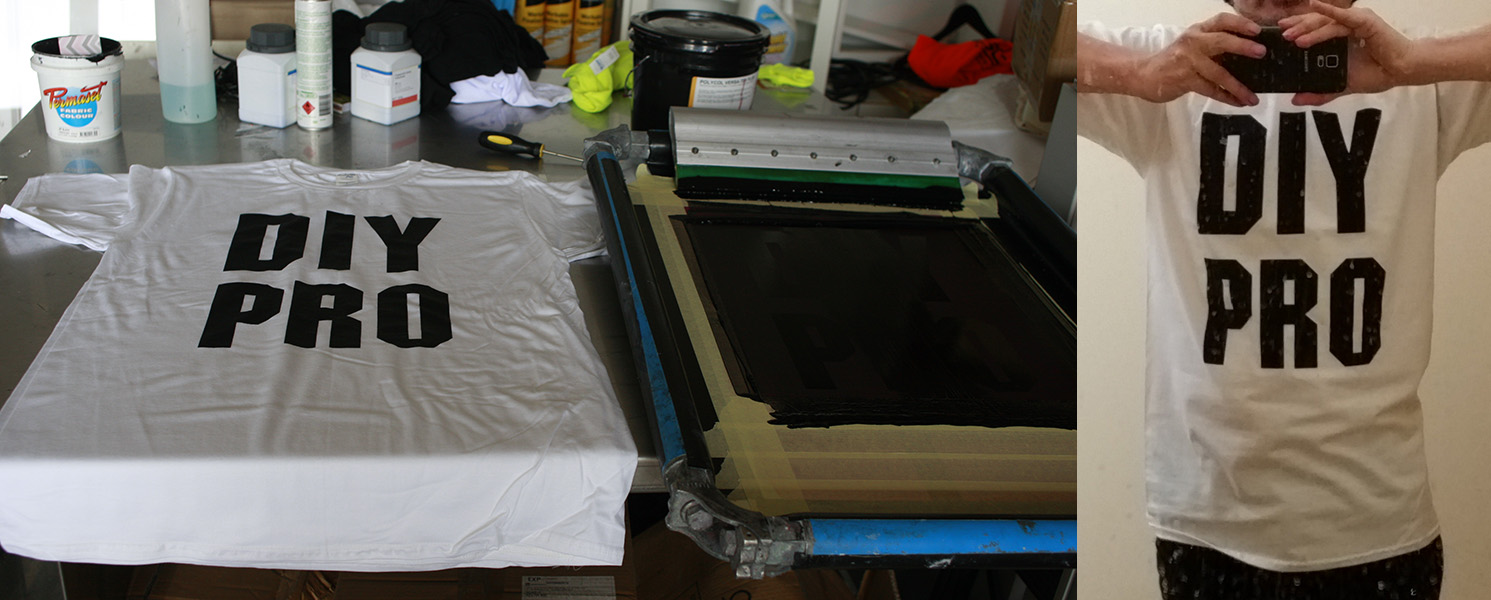
Printed -shirt. Notice the back flooded ink on the screen. How it looks on a person. Success!
For this project I have used Permaset Aqua water based screen printing inks. It is a professional quality screen printing ink used by many commercial screen printers in Australia. You can ask for advice from your local art and craft shop or even your local screen printer where to get quality screen printing ink locally. Work out a method to secure your screen so that when you push or pull the squeegee, the screen does not move. A screen printing jig is ideal but if you do not have one, you can just park the screen against something sturdy when printing. The frame I used is quite heavy and I just pulled the squeegee against my stomach. The print came out perfect. You can use a table edge or a wall for the same effect. Print with one or two strokes for a dark coloured ink onto a light coloured garment. If you need more than two strokes, you have done something wrong along the way. Perhaps not loaded enough ink into the screen, not back flooded after the previous print leading to caking or simply working too slow so the ink has dried up. If you push too much ink into the t-shirt, the ink can spread under the stencil and your next print will be muddy. Screen printing more than one stroke can also result in the ink seeping into the other side of the t-shirt, thus ruining your t-shirt. Each stroke needs to be in the same direction. If you are pulling the squeegee on the print stroke, you need to also pull on the second stroke. Do not push on the second stroke. Also try to keep the squeegee angle the same if doing multiple strokes. If you have over exposed your screen it may be another reason why you need more than 2 strokes.
Water based inks use water as the carrier. Water as you know dries in air so you need to work fast. Set up everything you put ink into the screen from the tub. Get a rough idea of where to place the screen for the ideal location of your print. Locate your blank garments and put them nearby. When you start you need to work really fast and not stop. No time to start looking around for missing t-shirts or working out a place to put the printed garments which are still wet. Back flooding is essentil for water based inks. After every print you need to remove the screen from the t-shirt and glently do a reverse stroke to cover the exposed areas of the screen with ink. We need to keep the exposed ares filled with ink so taht ink does not dry out and block the screen. So the procedure is print in one or two strokes, remove the screen from the garment, back flood, remove the wet t-shirt and reload with a blank t-shirt. With regards to the actual printing if you are doing two strokes, stroke in the same direction both times. If you use pull stroke to print, the second stroke needs to be also a pull stroke.
Do test prints onto rags to get the hang of it before using your good t-shirts. You may need to practice about 10 prints before you get a decent one. As a novice you will find that ink gets everywhere you don't want it. On your fingers, clothes, screen frame, the printing table etc. Have a rag handy to wipe as soon as you notice it.
Step 7: Drying the Screen Printed t-shirt for Final Cure
After the print is touch dry and water removed from the t-shirt, water based inks need to be heat set further to ensure a durable print. After printing you can hang dry the t-shirt or speed it up with a hair dryer. Once it is touch dry you can place a baking sheet over the printed area and iron over the print to heat set it. Each t-shirt will require a few minutes of additional drying. Final cure only occurs after all the moisture has been expelled so you need to keep ironing for a little while longer even if you don't see any steam escaping from under the baking sheet. Some hobby screen printers have had success utilising a tumble dryer for final cure, others have used a heat press which should work much quicker. Lastly, wash the t-shirt. If the print comes out looking like it did when you put it into the washer, you have a properly cured garment. Congratulations, you have just printed a high quality custom screen printed garment which will last you many years.
Last Words. Screen printing your own t-shirts can be a very frustrating process when things go wrong. As a novice, everything and anything will go wrong and you will be wondering why you even bothered to attempt it, we have all been there. On the other hand it can also be a very rewarding process. You will feel top of the world wearing a t-shirt that you have designed and printed from scratch. A t-shirt which is one of a kind which will last you many years of wear. If you have printed the t-shirts for a group, there is the opportunity to save a lot of money. The cost of screen printing is mostly due to the labour involved, not the cost of materials which is very little. For this project material set up costs are approximately $3, card stock costs less than $1, emulsion $2. Ink will cost approximately 50c per print. Blank t-shirts cost $3-5. Imagine the cost savings compared to ordering from a screen printing shop.
Screen printing t-shirts is all about your mindset. Work slowly and carefully. Experiment. Take notes. Troubleshoot. Then you will succeed in your t-shirt screen printing endeavours.
Please download the printable pdf of this guide if you wish to print a copy.
If you require professional high quality screen printing, feel free to order online or get a cheap screen printing quote from us.